Lesson of the Day 75: The Addition Strip Board — Discovering Addition Facts Through Hands-On Strip Exploration
Published on: May 15, 2026
"The child who has been taught by a purely abstract method is not only unable to perform, but has no wish to perform." — Dr. Maria Montessori
If you've ever watched a young child use their fingers to add two small numbers together, you've witnessed something beautiful — the mind reaching out for something concrete to hold onto while wrestling with an abstract idea. The Montessori classroom honors this instinct. Rather than asking children to memorize addition facts through rote drilling and flashcards, it gives them a material that makes the very structure of addition visible, touchable, and discoverable: the Addition Strip Board.
This elegant material — a simple ruled board paired with red and blue numbered strips — allows children to physically build addition equations. They lay one strip down, then another beside it, and read the sum right off the board. Over time, through repeated, self-directed exploration, the addition facts don't just get memorized — they get understood. Today, let's take a close look at this powerful material, how it's presented, and how you can bring it into your home.
What Is the Addition Strip Board?
The Addition Strip Board is a Montessori math material designed to help children learn and internalize all the basic addition facts — every combination from 1+1 through 9+9. It consists of three components:
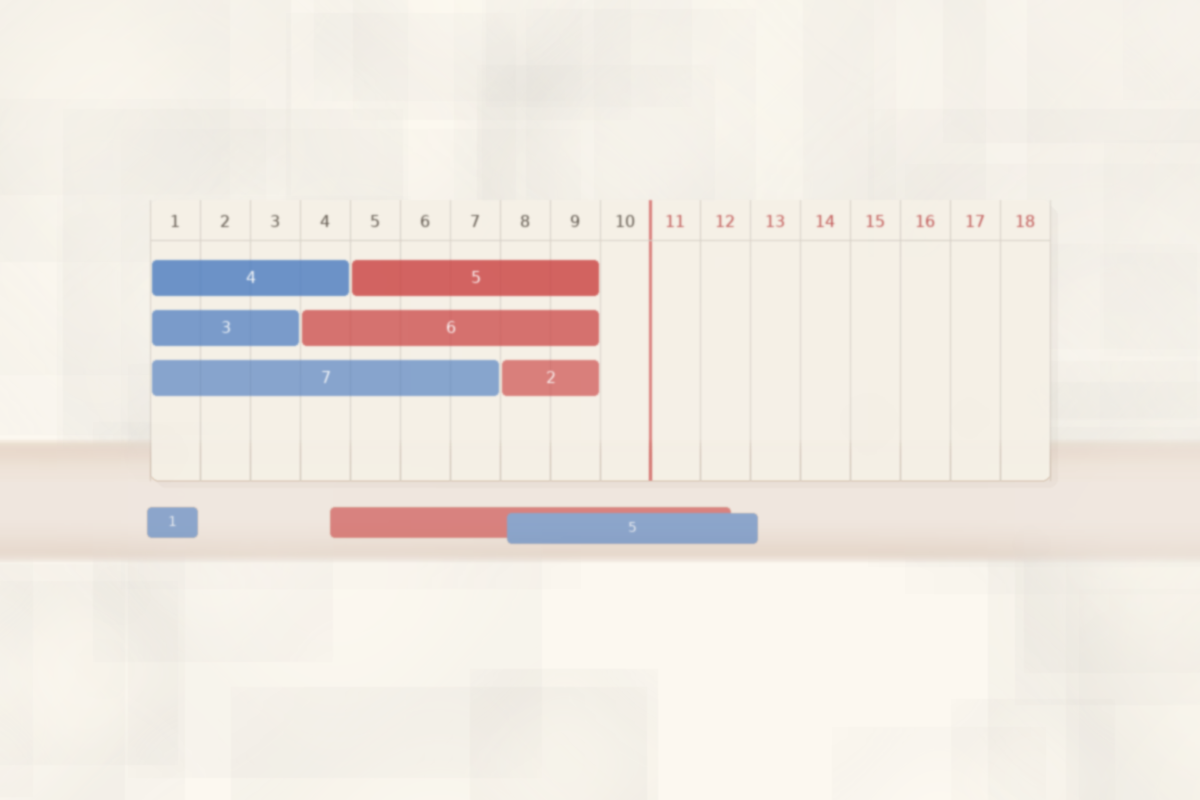
- The Board: A flat board (sometimes called the Addition Chart 1 board) ruled into a grid. Across the top, the numbers 1 through 18 are printed. The board is typically divided at the number 10 by a vertical red line, which visually reinforces the concept that sums greater than 10 have "crossed" into the teens.
- Blue Strips: Nine wooden or plastic strips, numbered 1 through 9, all in blue. These represent the first addend in the equation.
- Red Strips: Nine wooden or plastic strips, also numbered 1 through 9, all in red. These represent the second addend.
Each strip's length corresponds to its number — the "3" strip is exactly three squares wide, the "7" strip is seven squares wide, and so on. When a child places a blue strip and a red strip end-to-end on the board, the right edge of the red strip lands on the sum. Addition becomes a physical act of combining lengths — a concept so intuitive that children often grasp it instantly.
Where Does the Addition Strip Board Fit in the Montessori Math Sequence?
The Addition Strip Board occupies a critical place in the Montessori math curriculum. It belongs to the memorization of math facts sequence — the body of work that helps children transition from understanding operations concretely to knowing the facts fluently. Here's where it typically falls:
- Counting and Quantity (1–10): The child has mastered one-to-one correspondence using the Spindle Boxes, Number Rods, and Cards and Counters.
- Introduction to the Decimal System: Through the Golden Bead Material, the child understands units, tens, hundreds, and thousands — and has performed addition with exchanging using concrete beads.
- Linear Counting: The child has worked with the Seguin Boards, the Hundred Board, and the Bead Chains for skip counting.
- The Snake Game: Many Montessori classrooms introduce the Addition Snake Game before the Strip Board. In this beautiful exercise, children build a "snake" of colored bead bars from the Bead Stair and then convert them into tens (golden bars) and a remainder — experiencing addition as the combining of quantities in a very sensory, dynamic way.
- The Addition Strip Board ← You are here!
- Addition Charts and Blind Charts: After working extensively with the Strip Board, children move on to the Addition Charts (Charts 1 through 6), which progressively abstract the facts until the child can fill in a blank chart from memory.
- The Stamp Game and Bead Frame: These materials, including the Stamp Game and the Bead Frame, continue to reinforce multi-digit operations with increasing abstraction.
Age Range
The Addition Strip Board is typically introduced between ages 4.5 and 6 in the Primary (Casa) environment. The child should be comfortable counting to at least 18, understand the basic concept of combining quantities, and ideally have had some exposure to the Golden Bead Material's addition operation. Some children in lower elementary (ages 6–7) also use the Strip Board if they need to solidify their addition facts.
How to Present the Addition Strip Board
As with all Montessori presentations, approach this lesson with calm, deliberate movements and a spirit of shared discovery. Invite the child to come work with you — "I have something new and exciting to show you today."
Materials Needed
- The Addition Strip Board
- The set of blue strips (1–9)
- The set of red strips (1–9)
- A small piece of paper and pencil (for recording equations)
- Addition Tables booklet or pre-printed equation sheets (optional)
Presentation 1: Introduction to the Material
- Carry the material to the table together. Place the board in front of the child. Lay the blue strips in order on one side and the red strips in order on the other side. Take a moment to let the child observe the material.
- Orient the child to the board. Run your finger along the numbers at the top: "Look — we have the numbers 1 through 18 along the top." Point out the red line at 10: "Do you see this red line? It's right at ten. Everything past this line is more than ten."
- Build the first equation. Say, "Let's try three plus two." Select the blue 3 strip and place it on the board, aligning its left edge with the number 1. The strip will extend from 1 to 3.
- Add the second addend. Select the red 2 strip and place it directly to the right of the blue strip — its left edge touching the right edge of the blue strip. The red strip will end at the number 5.
- Read the sum. Point to where the red strip ends: "The red strip ends at 5. So, three plus two equals five."
- Record the equation. Write on the paper: 3 + 2 = 5. Let the child watch you write it, connecting the concrete experience to the symbolic representation.
- Clear the board and invite the child to try another combination. Let them choose the strips this time.
Presentation 2: Working Through an Addend Systematically
Once the child is comfortable with the basic mechanics, introduce a more structured exploration:
- Choose a starting number. Say, "Today, let's find all the ways to add with four." Place the blue 4 strip on the board.
- Add the red 1 strip. Read the sum: "Four plus one equals five." Record: 4 + 1 = 5.
- Replace the red strip with the 2. Read: "Four plus two equals six." Record: 4 + 2 = 6.
- Continue through all red strips (1–9). The child will build 4+1 through 4+9, creating a complete column of equations on their paper.
- Observe and discuss. Ask the child what they notice. "What happened each time we used a longer red strip?" The child may observe that the sum grows by one each time — a wonderful early insight into the pattern structure of addition.
Presentation 3: Sums Greater Than 10
This presentation introduces a key moment — when the red strip crosses the red line at 10:
- Place the blue 7 strip on the board. Add the red 5 strip.
- The red strip crosses the red line and ends at 12. Say, "Seven plus five equals twelve. See how our answer passed the red line? That means our sum is more than ten."
- This visual boundary at 10 is a subtle but powerful reinforcement of place value and the decimal system — the very concepts your child first explored with the Golden Bead Material.
Presentation 4: The Addition Tables Booklet
Over time, the child can work through a complete Addition Tables booklet — a set of pre-printed pages where the child uses the Strip Board to find and record every sum for each addend (all the 1+ facts, all the 2+ facts, etc.). This systematic work naturally leads to memorization through repetition — but it's meaningful repetition, grounded in physical experience, not mechanical drilling.
Variations and Extensions
The Addition Strip Board lends itself to a rich variety of extensions as the child's understanding deepens:
- Commutative Property: After building 3+5=8, ask, "What do you think would happen if we tried 5+3?" Let the child discover that the sum is the same. This is a child's first encounter with the commutative property of addition — and it's far more powerful when discovered than when told.
- Finding All Combinations for a Sum: Instead of exploring all the facts for one addend, reverse the challenge: "How many ways can we make 10?" The child works through 1+9, 2+8, 3+7, and so on. This exercise is especially valuable for building number sense and preparing for subtraction.
- Doubles: Invite the child to build all the "doubles" (1+1, 2+2, 3+3…). Children love discovering these patterns, and doubles are some of the first facts most children memorize.
- Transition to the Addition Charts: Montessori classrooms use a series of Addition Charts (Charts 1 through 6) that progressively remove the concrete support. Chart 1 is a complete reference; Charts 2 and 3 begin to show patterns; Charts 4, 5, and 6 are increasingly blank, requiring the child to fill them in from memory. The Strip Board is the foundation that makes this abstraction possible.
- Connection to the Subtraction Strip Board: Once addition facts are solid, the child can be introduced to the Subtraction Strip Board — a natural inverse. The fact that 7+5=12 leads directly to the understanding that 12−5=7.
Tips for Home Use
The Addition Strip Board is one of the most accessible Montessori math materials for the home environment. Here's how to make the most of it:
- Follow the child's pace. Some children will want to work through every combination in a single sitting; others will do three equations and walk away. Both responses are perfectly fine. The key is that the child returns to the work voluntarily, again and again. This is where true memorization happens — not through pressure, but through concentration and interest.
- Keep it available. Place the Strip Board on an accessible shelf where your child can choose it during their work time. Montessori materials work best when they're available for independent, repeated use — not brought out only when an adult decides it's "math time."
- Don't rush to the abstract. It can be tempting to move straight to worksheets and flashcards once your child seems to know some facts. Resist this urge. The beauty of the Strip Board is that it lets the child work at the boundary between concrete and abstract — building the facts physically while simultaneously recording them symbolically. This dual engagement is where deep learning lives.
- Pair with the Bead Stair. If your child has a Bead Stair, you can have them verify Strip Board answers by counting out the corresponding bead bars. This multi-sensory reinforcement — seeing the lengths on the board and feeling the beads — strengthens understanding.
- Make it a game. Once your child is familiar with the material, try calling out equations for them to build — or let them call out equations for you to build (and occasionally "make mistakes" for them to catch). The joy of teaching is one of the most powerful motivators for a young learner.
- DIY option: If purchasing the material isn't feasible, you can create a simple version at home with a printed number line (1–18), cardstock strips cut to proportional lengths, and colored markers. It won't have the same elegance as the wooden material, but the mathematical experience will be very similar.
Why This Material Matters
In a conventional math classroom, addition facts are typically taught through memorization — often with timed tests, drills, and the anxiety that comes with them. Some children manage to memorize this way; many others develop a fraught, fearful relationship with math that can last a lifetime.
The Addition Strip Board takes a fundamentally different approach. It asks the child to construct every addition fact with their own hands. When a child places the blue 6 strip and the red 8 strip on the board and sees the total land on 14, they haven't just been told that 6+8=14. They've built it. They've seen it. They've felt the physical reality of two lengths combining into a longer one. And they've recorded it in their own handwriting.
This is what Maria Montessori meant when she spoke of the passage from concrete to abstract. The Strip Board doesn't replace memorization — it prepares the mind for memorization by giving the facts a concrete foundation. When a child who has worked extensively with the Strip Board later encounters 6+8 on a page, they don't just recall a memorized answer. Somewhere in their mind, they can still see those two strips meeting at 14. The knowledge is embodied — woven into their understanding of how numbers work.
The Strip Board also quietly teaches other profound mathematical ideas: the commutative property (turn the strips around and the sum is the same), the pattern structure of addition (sums increase predictably), and the significance of 10 as a benchmark number. These aren't lessons that need to be explicitly taught — they emerge naturally through the child's own exploration.
Perhaps most importantly, the Addition Strip Board gives children independence. Because the material is self-correcting — the strips either land on the right number or they don't — the child doesn't need an adult to tell them if they're right. They can work, discover, check, and learn entirely on their own. And there is no greater gift we can give a young mathematician than the confidence that comes from knowing: I figured this out myself.
Suggested Products
If you're ready to bring the Addition Strip Board into your home, here are some excellent options:
- Montessori Addition Strip Board with Strips — A complete set with the ruled board and all red and blue strips. This is the classic wooden material used in Montessori classrooms worldwide.
- Montessori Math Addition and Subtraction Strip Board Set — This combination set includes both the Addition and Subtraction Strip Boards, providing excellent value if you'd like to have both operations available as your child progresses.
As you bring this material home, remember: the Addition Strip Board is not a one-afternoon activity. It's a material your child may return to again and again over weeks or even months — each time deepening their understanding, solidifying their facts, and building the quiet confidence that comes from truly knowing how numbers combine. Trust the process, follow your child, and enjoy watching those strips line up, one beautiful equation at a time.